运行环境
Vue 使用的是D2admin:
Github地址: Net Core的环境:Webapi 使用的是:NET Core SDK2.1 IdentityServer和Ocelot:NET Core SDK2.2 Github地址: 我也是在初学阶段,所以有些地方可能描述的不是很清楚,可以下载源码查看,也可能大家一起交流,学习建立IdentityServer4项目
根据 根据Edison Zhou大佬的博客,配置好 QuickStart UI 以及IdentityServer的依赖项 新建IdentityServer4的配置文件IdentityConfigpublic static IEnumerableGetIdentityResources() { return new IdentityResource[] { new IdentityResources.OpenId(), new IdentityResources.Profile(), new IdentityResource("delimitClaim","delimitClaim",new List (){ "role", "name"}), //在Claims添加role 和 name信息 }; } public static IEnumerable GetApiResource() { return new List { new ApiResource("identityServerApi", "identityServerApi"), }; } public static IEnumerable GetClients() { new Client { ClientId = "js", //客户端Id ClientName = "JavaScript Client", //客户端名称 AllowedGrantTypes = GrantTypes.Code, //授权模式 //AllowedGrantTypes = GrantTypes.Implicit, RequirePkce = true, RequireClientSecret = false, RequireConsent = false, //禁用 consent 页面确认 AllowAccessTokensViaBrowser = true, AlwaysIncludeUserClaimsInIdToken = true, RedirectUris = { "http://localhost:8080/#/IdentityServerCallBack", //登陆后回调页面 "http://localhost:8080/#/IdentityServerRefreshToken" //刷新Token的页面 }, PostLogoutRedirectUris = { "http://localhost:8080/#/IdentityServerClient" },//注销退出后跳转的页面(登录页) AllowedCorsOrigins = { "http://localhost:8080" }, //跨域 AccessTokenLifetime = 60, //AccessToken 的有效时间 AllowedScopes = { IdentityServerConstants.StandardScopes.OpenId, IdentityServerConstants.StandardScopes.Profile, "identityServerApi", //授权的Scopes "delimitClaim" //Claims 信息 }, AllowOfflineAccess = true, } }
有时我们需要自定义验证以及自定义一些Claim的信息,所以需要实现 IProfileService 接口
public virtual Task GetProfileDataAsync(ProfileDataRequestContext context) { context.LogProfileRequest(Logger); //判断是否有请求Claim信息 if (context.RequestedClaimTypes.Any()) { var userClaims = new List { new Claim("demo1", "测试1"), new Claim("demo2", "测试2"), }; List userList = new List () { new TestUser(){SubjectId = "cfac01a9-ba15-4678-bccb-cc22d7896362",Password = "123456",Username="李锋",Claims = userClaims}, new TestUser(){SubjectId = "cfac01a9-ba15-4678-bccb-cc22d7855555",Password = "123456",Username="张三"}, }; TestUserStore userStore = new TestUserStore(userList); //根据用户唯一标识查找用户信息 var user = userStore.FindBySubjectId(context.Subject.GetSubjectId()); if (user != null) { //调用此方法以后内部会进行过滤,只将用户请求的Claim加入到 context.IssuedClaims 集合中 这样我们的请求方便能正常获取到所需Claim context.AddRequestedClaims(user.Claims); } //context.IssuedClaims=userClaims; } context.LogIssuedClaims(Logger); return Task.CompletedTask; } /// /// 验证用户是否有效 例如:token创建或者验证 /// /// The context. /// { new Claim("demo1", "测试1"), new Claim("demo2", "测试2"), }; List userList = new List () { new TestUser(){SubjectId = "cfac01a9-ba15-4678-bccb-cc22d7896362",Password = "123456",Username="李锋",Claims = userClaims}, new TestUser(){SubjectId = "cfac01a9-ba15-4678-bccb-cc22d7855555",Password = "123456",Username="张三"}, }; TestUserStore userStore = new TestUserStore(userList); var user = userStore.FindBySubjectId(context.Subject.GetSubjectId()); context.IsActive = user?.IsActive == true; return Task.CompletedTask; } 其中关于Claims的地方这里做测试所以直接实例出来的数据,这里可以通过读取数据库进行验证,以及添加Claims的信息
在Startup 的ConfigureServices 注入IdentityServer信息 ,Configure下注册UseIdentityServer中间件services.AddIdentityServer() .AddDeveloperSigningCredential() .AddInMemoryIdentityResources(IdentityConfig.GetIdentityResources()) .AddInMemoryApiResources(IdentityConfig.GetApiResource()) .AddInMemoryClients(IdentityConfig.GetClients()) //.AddTestUsers(IdentityConfig.GetUsers().ToList()) .AddProfileService(); //使用的是Code模式,使用自定义Claims信息 //.AddResourceOwnerValidator (); app.UseIdentityServer();
然后找到QuickStart中的登录方法,这里修改为从数据库读取验证用户信息

建立Vue项目
安装依赖项:oidc-client :npm install oidc-client --save axios:npm install axios --save 添加 IdentityServerClient 页面 添加 IdentityServerCallBack页面
  添加 IdentityServerCallBack页面
  访问IdentityServerClient 页面时会自动跳转到IdentityServer4的登录页面,输入账号密码,验证成功之后,会跳转到IdentityServerCallBack页面,然后在IdentityServerCallBack页面设置路由,跳转到目标页面 这里主要讲哈前端的配置,建议看https://www.cnblogs.com/FireworksEasyCool/p/10576911.html教程和oidc-client官方文档https://github.com/IdentityModel/oidc-client-js/wiki
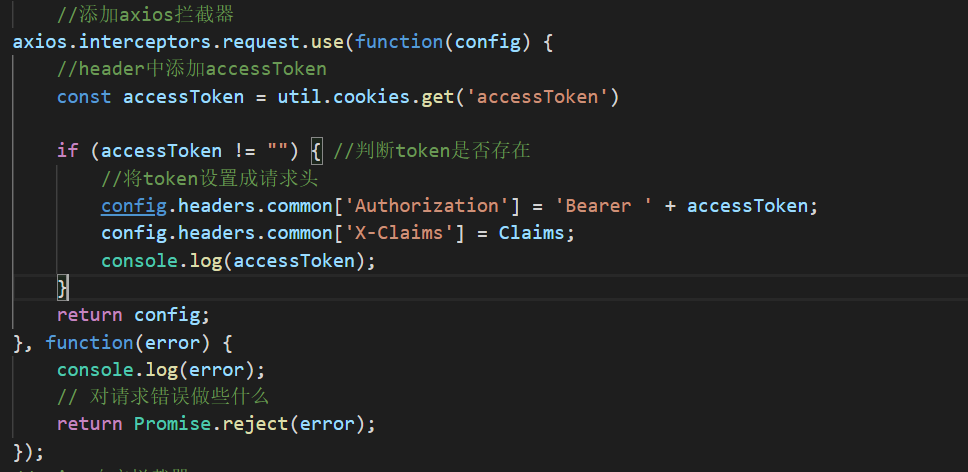
  注意使用:自动刷新Token使用自动刷新Token需要accessTokenExpiringNotificationTime和automaticSilentRenew 一起设置,当AccssToken要过期前:accessTokenExpiringNotificationTime设置的时间,会去请求 IdentityServer4 connect/token接口,刷新Token,请求到Token以后会触发addUserLoaded事件,我们可以把Token 保存在浏览器的缓存中(cookies,localstorage)中,然后在Axios中全局拦截请求,添加headers 信息
  Authorization 是token的信息,X-Claims是Claims的信息,传递Authorization 是为了IdentityServer 进行验证授权,X-Claims是为了后面结合Ocelot,携带一些Ocelot下游需要的参数进去
 建立OcelotGateWay项目
添加Ocelot.json文件"ReRoutes": [ { "DownstreamPathTemplate": "/api/{url}", "DownstreamScheme": "http", "DownstreamHostAndPorts": [ { "Host": "localhost", "Port": 44375 } ], "UpstreamPathTemplate": "/api/{url}", "UpstreamHttpMethod": [ "Get", "Post" ], "Priority": 2, "AuthenticationOptions": { "AuthenticationProviderKey": "IdentityServerKey", "AllowScopes": [ "identityServerApi", "delimitClaim" ] }, "RateLimitOptions": { "ClientWhiteList": [ //白名单 ], "EnableRateLimiting": true, //启用限流 "Period": "1m", "PeriodTimespan": 30, "Limit": 5 }, "QoSOptions": { "ExceptionsAllowedBeforeBreaking": 3, "DurationOfBreak": 3000, "TimeoutValue": 5000 } ]
}services.AddAuthentication() .AddIdentityServerAuthentication("IdentityServerKey", options => { options.Authority = "http://localhost:17491"; options.ApiName = "identityServerApi"; options.SupportedTokens = IdentityServer4.AccessTokenValidation.SupportedTokens.Both; options.RequireHttpsMetadata = false; }); services.AddOcelot() .AddConsul() .AddPolly(); //配置跨域处理 services.AddCors(options => { options.AddPolicy("any", builder => { builder.AllowAnyOrigin() //允许任何来源的主机访问 .AllowAnyMethod() .AllowAnyHeader() .AllowCredentials();//指定处理cookie }); }); //配置Cors app.UseCors("any"); app.UseAuthentication(); Program中添加
public static IWebHostBuilder CreateWebHostBuilder(string[] args) { return WebHost.CreateDefaultBuilder(args) .ConfigureAppConfiguration((hostingContext, config) => { config .SetBasePath(hostingContext.HostingEnvironment.ContentRootPath) .AddOcelot(hostingContext.HostingEnvironment) //ocelot合并配置文件,不能出现同样的一个端口,多个路由 .AddEnvironmentVariables(); }) .UseStartup (); } 学习的资料链接,参考资料
Edison Zhou: IdentityServer4和ocelot
晓晨Master: IdentityServer4 solenovex : IdentityServer4 bibi上还有IdentityServer4视频喔 灭蒙鸟: 入门教程:JS认证和WebAPI .Net框架学苑: ocelot 一系列教程